Update: This is an old post from when I first tried Rainbow Cookies. Take from it what you like. There's another old post with a recipe for my friend Marisa's Rainbow Cookies.
Italian Wedding Cookies, Rainbow Cookies, Tri-Color Cookies – pick the name you like. These little cakes of pink, yellow and green are less complicated than you think, but it's helpful to know a few things before making them. After multiple batches of 3 different recipes, I have a few tips. But first, I'll tell you a little about each of the Rainbow Cookies recipes I tested.
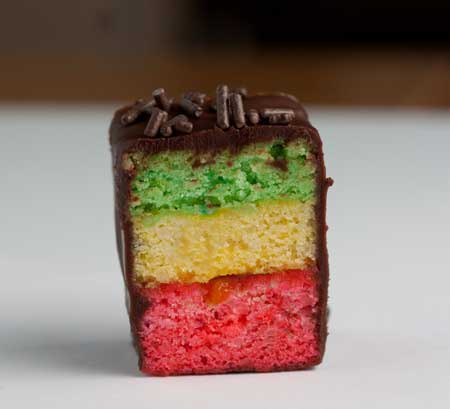
Food.com Rainbow Cookies
Number one on the list was a highly rated recipe from Food.com which is baked in 8 inch pans. It calls for almond pastry cake filling instead of almond paste and makes a soft, dense, very flavorful cookie that is really more like a little cake or petit four. Here they are pictured below. This was my first batch. They're not perfect, but I was very happy with them at the time.
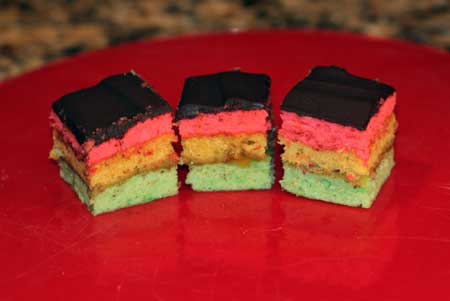
Culinary in the Desert Seven Layer Bars (Joe's)
The second recipe was Joe's Culinary in the Desert Seven Layer Bars made in a 13x9 inch pan. The layers were quite thin, and since I prefer more cake in each slice, I tried Joe's recipe again in a slightly smaller (11x9 inch disposable pan). Better. This is a solid recipe, but it's from Joe so no surprise there. So you can make these in a 13x9 inch pan or go with a pan that's a little smaller.
Allrecipes.com and Gourmet Italian Wedding Cookies II
The third recipe was on Allrecipes.com and Gourmet, with the Allrecipes.com version (Italian Wedding Cookies II) having 1 oz more almond paste. I chose this one over the Gourmet recipe because I figured I needed all the almond paste I could get to balance out the 3 sticks of butter. The only change I made was to use the 11x9 inch pans again.
Here’s a photo of three Rainbow Bars from the two recipes I just mentioned. Joe’s recipe baked in 13x9 inch pans, Joe’s recipe baked in 11x9 inch pans (I sliced those a little thin. Whoops!) and the Allrecipes.com/Gourmet recipe with the 24 tablespoons of butter. My favorite was Joe’s, but baked in the 11x9 inch pans (the middle one).
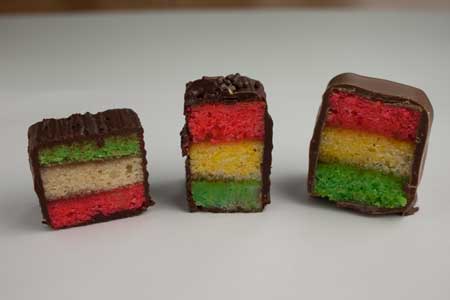
Dipping Rainbow Cookies in Chocolate
This is where the fun starts. You'd think that dipping these in chocolate might be difficult, but if you freeze the cake and then cut it into little sticks, it's kind of fun. Thanks for the tip, Eric in AZ.
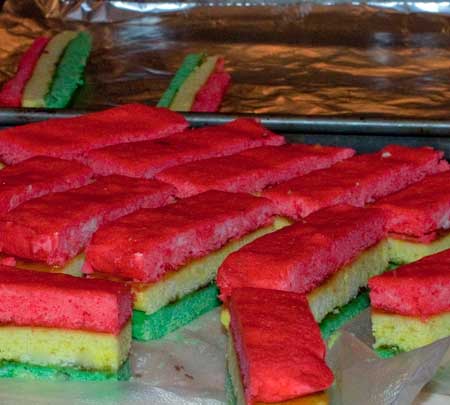
For my first batch, I just spread chocolate over the top as pictured in the second (and worst) photo. For all consecutive batches, I skipped the step of refrigerating the layers and put the cooled, stacked, layers, tightly wrapped, in the freezer. When ready to coat with chocolate, I took them out of the freezer, cut into butter-size sticks, and tried different methods of coating them with chocolate.
The Right Chocolate for Dipping/Coating
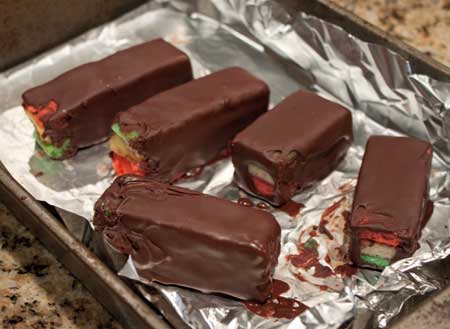
Dipping is best if you have really good chocolate or couverture that’s thin and at the perfect temperature. I had an assortment of fairly decent chocolate from the grocery store plus chocolate chips and almond bark to play with. After testing lots of ratios of chocolate to butter, chocolate to shortening, and chocolate chips to both, I found the one that worked best was a 2:1 ratio of chocolate (not chips) to butter. That is, 6 oz of chocolate and 3 oz of butter. Chocolate chips work better with shortening than with butter, but I didn't like the flavor of the shortening and threw that version out even though it worked very well for dipping. I don’t have any couverture at the moment, but that's probably the best bet. Update: You can also use any brand of chocolate bar melted with a little coconut oil. I don't have the exact ratio for that but will update.
Here's a batch dipped in a mixture of 4 oz of Ghirardelli Intense Chocolate Twilight 60%) mixed with 2 oz of butter.
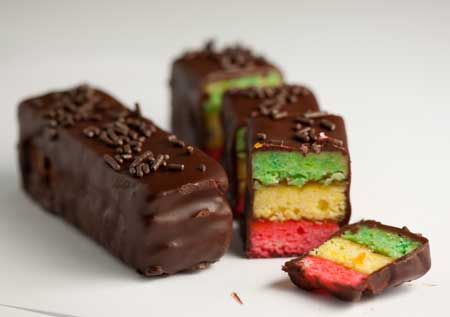
Now that I have some experience making Rainbow Bars, I recommend the Food.com recipe made with almond cake filling (Solo) or Joe’s recipe made with Odense, Solo or homemade almond paste. If you are using Odense (the kind in the tube), make sure to grate it before adding it to the sugar. If you don’t, you might end up with lumps of almond paste in your cakes. You can see the little lumps in mine.
Rainbow Cookies Ingredient Info
- Eggs -- This recipe calls for four, and good news -- you do not have to separate them. The recipe does say to beat them separately, so you will beat them on their own and then add them back to the creamed mixture.
- Sugar -- Regular granulated white sugar.
- Almond Paste -- I would not classify almond paste as a very common American baking ingredient. It's readily available, but people who buy it usually know what they are doing. Don't stress about the almond paste (like I did), just make sure to buy the kind that comes in a roll rather than a can. If you are daring, you could even make your own. I tested this one from Taste of Home and it worked perfectly.
- Butter -- Any brand, unsalted
- Almond Extract -- Any brand
- Salt -- Table salt or Morton Kosher. If using Diamond kosher you'll need 1 ½ times.
- Flour -- Regular all-purpose
- Food Coloring -- Gel or paste type such as Wilton.
- Jam or Preserves -- Anything seedless
- Chocolate -- Not chips. You can use any kind of bar mixed with butter or use bar chocolate melted with a little coconut oil.
Recipe

Rainbow Cookies Recipes and Tips
Ingredients
- 4 large eggs room temperature
- 1 cup granulated sugar (200 grams)
- 8 ounces almond paste – homemade or Odense or Solo grated
- 2 ½ sticks unsalted butter, softened (280 grams)
- 1 teaspoon almond extract
- ½ teaspoon salt
- 2 cups all-purpose flour (260 grams)
- Green food coloring
- Yellow food coloring optional
- Red food coloring
Chocolate Coating
- 1 jar 12 ounce jar seedless raspberry or apricot jam, heated
- 6 oz unsalted butter
- 12 oz good quality chocolate
Instructions
- Preheat oven to 350 degrees F. Spray three 13x9 inch or 11x9 inch pans with cooking spray and line with parchment paper.
- In the bowl of a stand mixer using the whisk attachment, beat the eggs until thick and foamy (about 3 minutes). Pour them in a separate bowl, then add the sugar and the grated almond paste to the stand mixing bowl and beat until well-combined using the paddle. Beat in the butter, then beat in the already-beaten eggs. Continue beating as you add the almond extract and salt. With mixer on low (or by hand) gently stir in the flour.
- Evenly distribute batter between 3 medium bowls. If you have a scale, weigh the total amount of batter and divide it into three equal bowls. Mix red food coloring into one, green food coloring into another, and yellow into another. Spread batter evenly across the parchment lined pans. The batter is thick and this task is kind of a challenge. I used a rubber scraper. Bake for 10-14 minutes or until a toothpick inserted in the center comes out clean. Let cakes cool completely on a wire rack.
- When layers are cool, carefully loosen from pans and lift out by grasping parchment. Transfer the green layer to a large sheet of plastic wrap. Spread the green layer (top) with preserves. Top it with the yellow layer and spread yellow layer with preserves. Cap with pink layer. Wrap the plastic wrap around the stack of cakes and put the stack in one of the original pans. Put the stack in freezer. Note: Most recipes say to weigh down the layers, but I never weighed them down. Freeze until ready to use.
- On or before the day you plan to serve the bars, remove the frozen cakes from the freezer. Place on a large cutting board and slice frozen cakes into bars the size of a butter stick – about 1 inch wide and 4 ½ inches long. Trip the edges before or after slicing. If you plan on dipping, it's best to trim just the short sides of the rectangle and keep the long sides of the rectangle raggedy so that you'll have a longer handle for dipping. You're going to trim those anyway.
- Keep the sticks frozen as you melt the chocolate.
- Melt the butter in the microwave. Add the chopped chocolate to the melted butter and stir well. Return to microwave and microwave at 50% power for 30 second intervals, stirring at each interval until chocolate is melted and smooth. I did this all in a 2 cup Pyrex measure in smal batches – 3 oz of chocolate to 1 ½ oz butter.
- You can dip the cake sticks in the melted chocolate if it’s thin enough (which will depend on which brand of chocolate you use and how much you heated it) or you can just use a silicone pastry brush and just paint the chocolate coating all over the sticks and let it set. If it looks messy, coat with chocolate sprinkles – the kind called "Jimmie's" which are softer and less annoying than crunchy sprinkles.
- Once your cake sticks are coated with chocolate and set, trim the raggedy ends and cut into about 4 neat squares.
- I kind of lost track of yields, but if you figure you get 18 butter stick size cake sticks from an 11x9 inch pan and cut each into 3 pieces (minus the trimmings), you should get at least 54 nice size squares.

Anna says
Hi Erica,
Thank you so much for taking the time to leave that comment. I truly appreciate it. Rainbow cookies are not exactly my specialty, but I had a good time making them and loved the recipe. I'm very pleased to hear that the directions were easy for you to understand. I never know just how thorough to be because I don't want people to get overwhelmed with tiny details. On the other hand, it's never good to leave out important steps. So thanks for letting me know this one worked for you.
Erica says
hi there!
I just wanted to stop by and say I've been making this recipe for YEARS, and it is everyone in my life's absolute favorite. I am a total rainbow cookie snob and these are as close to perfection as they get. I generally used to suck at baking but in the last 6 years or so have really tried to improve my skills, using this recipe as one of my first major challenges. Your directions were super easy to follow, and I really appreciate your trial/error on getting the right consistency (because some rainbow cookies may look good, but they're not all created equal). Thanks again, and just know my entire family expects these from your recipe every year for the holidays!
Anna says
Hi Beth,
You just never know with bake times. Most of the time they're pretty accurate, but sometimes it involves trial and error. I'm really glad you liked the recipe.
Beth P says
Hi Anna, Beth here again! I’m going to revise what I said about the baking time. After all said and done, once completed with jam and chocolate the original bake time you suggest was good. I baked about 12 min and they were not dry as I originally thought. I might cut that back very slightly to 10-11 min but otherwise just fine at 11-12. I wouldn’t say I mastered them on first try but they were super good and when I do them again (and I will) then maybe I’ll master them thanks again for a great recipe!!
Anna says
Hi Beth, Thanks so much for sharing your insight. I love Rainbow Cookies, but I don't make them often so I don't have a great list of tips. I'll go ahead and make a note that it took you 8 to 10 minutes. Will also note your experience with the jam and chocolate. I'm glad you were able to master these on the first go-round.
Beth says
I looked through a lot of recipes for these when I came across this one. It’s great and I really appreciate all the extra work that went into putting together the final product! Less steps than most abs final product was really good (for my first time doing this). Only thing I will do differently next time is less baking time, 8-10 min, will not heat the jam either. Seemed unnecessary and made it too loose. I painted the chocolate on because the bowl I had was not good for dipping but it worked out great. I actually dipped the bottoms and painting on the rest with rubber pastry brush. Thumbs up!
Anna says
Enjoy the recipe! And good luck finding the filling, because it does seem harder to find.
Christine says
I have an old family recipe with almond filling and margarine....I am having increasing trouble every year finding the filling. I am going to try this recipe today...this is the favorite cookie of my family-I am hoping they don't know the difference! My recipe is made in 8x12 pans. And when you are ready to frost, I frost it as a whole 8x12 cake, then cut into square 🙂
Thank you for all your trials and testing!
Anna says
Hi Lauren,
I haven't made that one in a while, but I really loved it. So yes! Try that one. Another thing you could do is just increase the almond extract. However, that one from Joe and Food.com is really good and uses the Solo filling.
Lauren says
LOVE this recipe and all the tips and tricks!
Going for MORE almond flavor, I want to try to make these cookies with Almond Cake Filling (SOLO) instead of almond paste this time. Do you suggest I follow your interpretation of Joe's recipe or the Food.com recipe?
Anna says
Hi Nicole,
I used a few different methods. For some I did use tongs, but since I was working with a small amount of chocolate and didn't have a huge vat of chocolate to really dip down into, I ended up spooning chocolate over some of them. You can use whatever method works best for you. I usually end up dipping bars in by going straight down and pulling back up so just the bottom is covered, then I set that down right in the chocolate, spoon chocolate over the top, lift with two forks and let the rest drip off. But again -- use whatever method you like.
Nicole says
Hi Anna,
My cake is in the freezer waiting to be cut and dipped in chocolate. So exited for the finished treats! I am a native New Yorker living in California and you cannot find these cookies anywhere here!
I was curious how you dipped the frozen sticks? Are you just using your hands or tongs? Any tips for keeping it neat looking?
Thanks!
Anna says
Hi Liz, They are nearly impossible to find in Austin so I had to learn to make them myself. It's been a while since I made these, but they were a huge hit and worth all the work. So glad to hear the recipe worked well for you, too.
Liz says
I'm a native New Yorker living in FL and these cookies are hard to find. I have tried this recipe several times now with GREAT success and every time I have made them, people rave over how I have been able to reproduce them. Thank you so much! I have one small part of the Italian bakeries I so dearly miss back.
Anna says
Good luck, Marilyn! They're a lot of fun to make. My favorite part of the process was cutting the frozen bars into sticks and dipping them.
Marilyn Collins says
Thanks so much for such detailed instructions. I am getting ready to bake these and have been looking at recipes and found yours on Pinterest. They look wonderful! I really appreciate the extra tips.
Anna says
Hi Rosanne! I usually put dipped bars (and other things) on a baking sheet lined with parchment paper. If I'm out of parchment I'll use nonstick foil, and if I'm out of parchment and nonstick foil I'll just use regular foil.
Rosanne says
What do you do with the bars once dipped? Do you put then on parchment paper... Or aluminum foil? The dipping in chocolate part is the part I have yet to be very successful at. Help!
Jeanette says
I was searching the web for almond paste cookie recipes and stumbled upon yours. For years my brother-in-law would mail me boxes of delicious cookies/petit fours from an Italian Bakery in Brooklyn. Of course I feel in love with them. I have always wanted to make them and now I can't wait to try. Thank you for a very detailed recipe and all the tips. I think they will make a wonderful treat for Mother's Day!
Anna says
I'm so glad the photos were helpful. Thanks for letting me know :).
Nora says
I have been making these for a few years (only bake at Christmas time) while they always taste great, they never seem to look so good. Your step by step pictures were the key to my success. Thank you.
Theresa says
We had a rainbow cookie cake once, I was wondering if this recipe would need any changes to it to make into a cake . Thanks Theresa
Anna says
Hi Kim,
I'm so happy the info was helpful! I noticed the cookies made with almond paste had much less of an almond flavor than those made with the almond filling. If you make Joe's version with almond paste and use vanilla extract instead of almond, you should be fine. I actually forgot the almond extract in one batch and the cookies tasted very good, but not nearly as almond. Another idea is you could try the recipe that's currently on Taste of Home. They made theirs with ground hazelnuts or macadamia nuts. I may try that one next, actually. About the dipping, I did quick-set the frosting in the refrigerator. You don't have to, but it really speeds things up.
Kim says
Actually I have 1 more question. After the bars are dipped in the chocolate, did you put it in the fridge so the chocolate hardens? or did you just leave it out to harden. Thanks!
Kim says
Hi Anna! Wow, I can't believe I came across this post and it is current! I've always used the recipe with Almond Filling, but will definitely try the one you are recommending considering all the work you did. The only reason why I'm on the internet researching Rainbow Cookies is because I have a request from a friend (we are all from NY, but now living in FL, so these are hard to come by as you know) to make these. However, she wanted to know if I could make it with vanilla instead of the almond flavor because they don't like the almond flavor. I told her i will have to research this because the only rainbow cookies I've ever had is with the almond flavor cake. Any ideas? Thanks! I can't wait to try this version for myself!!!
Anna says
Hi Shannon,
Yes, I used 60%.
Shannon says
Wow, amazing! I like your tip for cutting the cookies into the size of a butter stick before coating with chocolate and for using a smaller pan for thicker cake layers. I'll have to try those.
Was 60% chocolate your favorite for coating? I tend to have a hard time deciding on how dark of a chocolate to use.
Erin says
I loved Jewish Rainbow Cake more than Rainbow Cookies. MMMM Rainbow cake I want some now!
EricinAZ says
I'm glad the tips were helpful....the cookies look delicious and the thin chocolate coating is spot on.
Cookie Sleuth says
So cute! Thanks for doing all of the research for us 🙂
Linda says
Great coincidence as these are the next cookies on my list to make. I'm modifying my 13x9 pans with foil to 11x9 and will let you know that works when I'm done. The recipe calls for 1 cup of sugar, divided...I can't find where the divided part comes into play...
Adam says
You're awesome Anna, and you're making the rest of us look bad :). I'm still amazed that I have never seen these in the wild. If not for the colour I would have never guess that they're Italian. I'm definitely going to have to try these out at some point, and maybe then I can teach my Grandmother something :). Thanks for all the work! :).
Michelle says
I have always wanted to try this kind of cookie. Yours all turned out beautifully!
Sarah says
Thanks for the almond paste recipe! I can't wait to adapt it to other nuts, as I'm allergic to almonds (boo) and have been relegated to using expensive, hard-to-find pistachio paste as a substitute.
Chewthefat says
I live in an area with a very sizable Italian-American community, so I see these cookies all of the time in bakeries and on commercially-baked cookie trays. Your homemade versions look so much more appetizing!
Debbie says
Just beautiful! They look perfect!
Sue says
oops! Not coated in butter!!! Coated in chocolate. Bad typo!
Anna says
Sue, they're always cut. The method of cutting them into sticks is just a way to coat them and dip them.
Sue says
Wow. I'm really wowed by all the work you did!
So, my only question is. When you purchase these at a bakery are they sliced into pieces or are they sold in the sticks coated with butter? They're very pretty!!
Anna says
Thanks Amy! I should have taken out that little speck of chocolate, though.
Amy says
love that last photo!